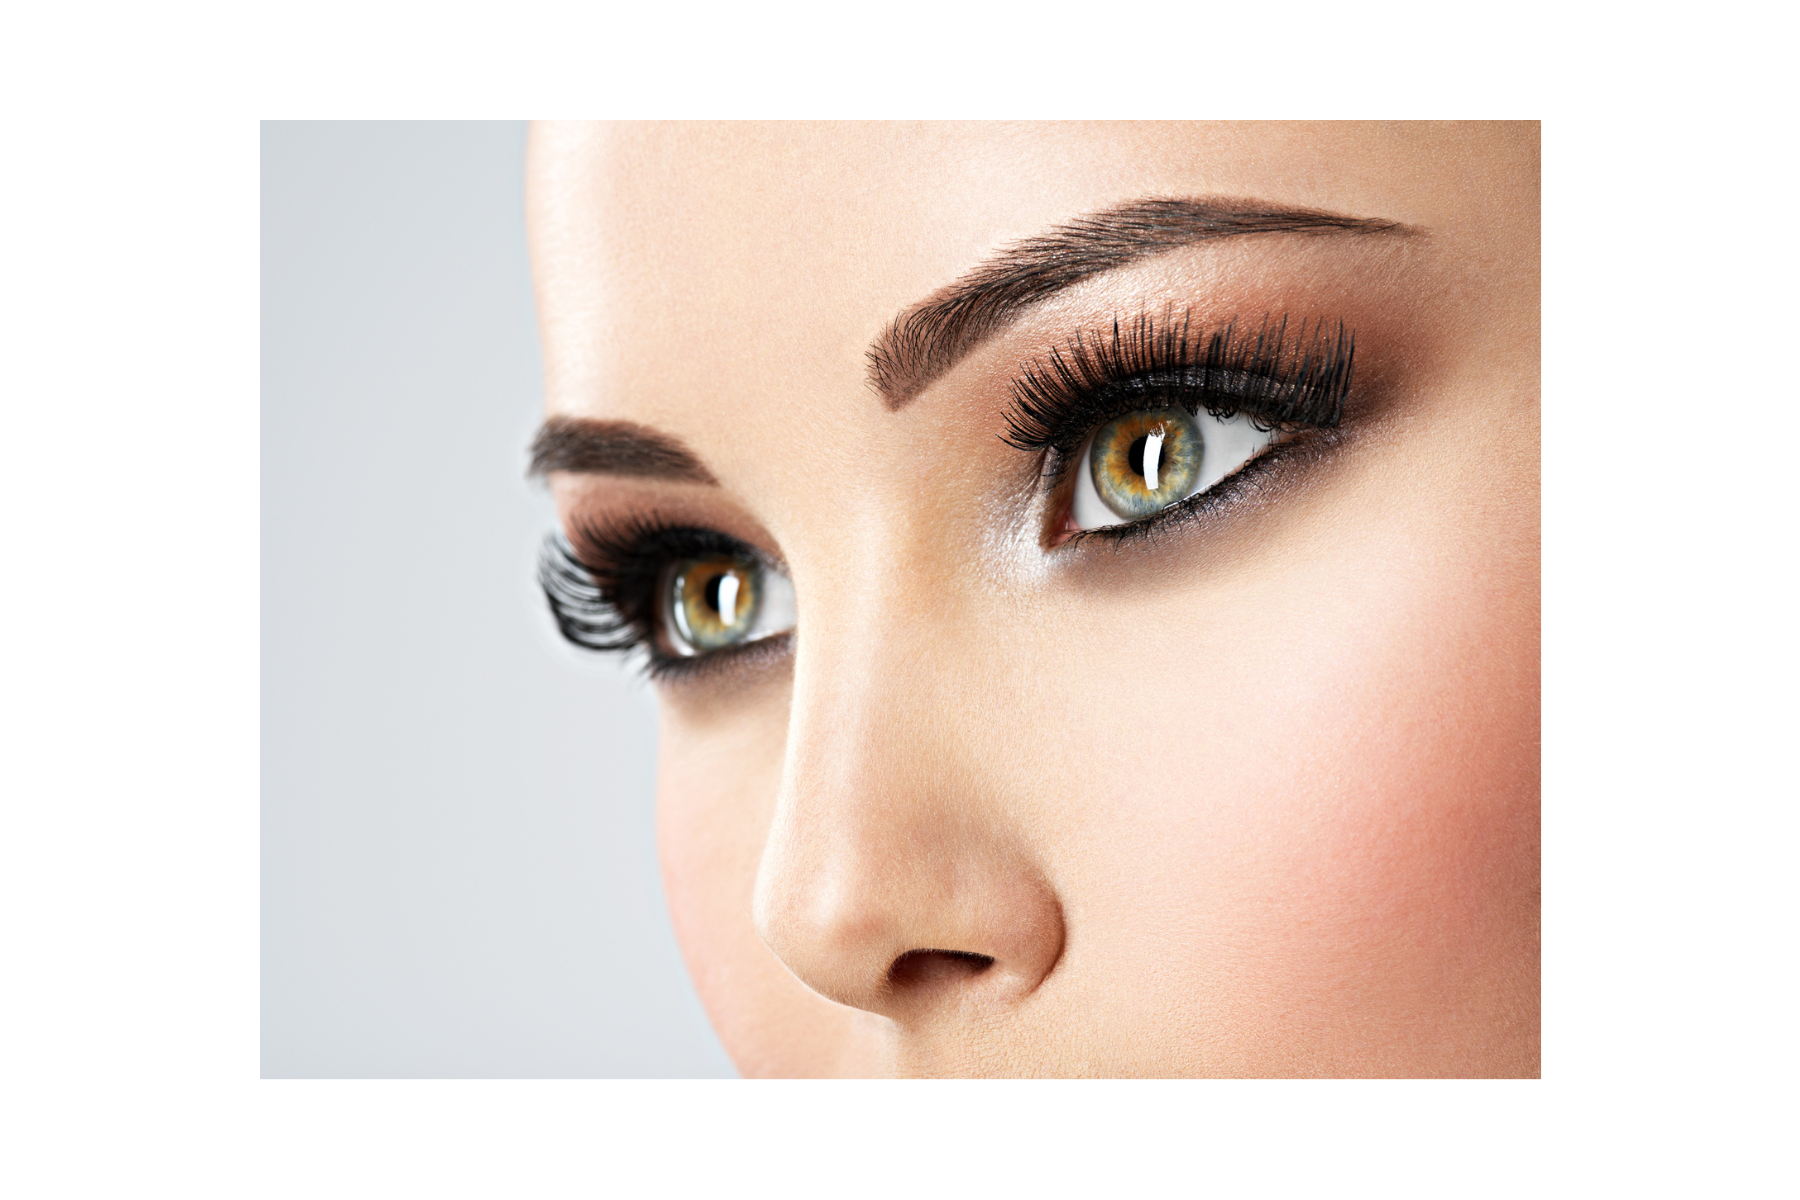
Smokey Eye Makeup Look
A smokey eye isn’t just makeup. It’s an expression of mystique. It draws attention to your gaze with an irresistible allure. Imagine your eyes, framed by deep, alluring shadows. To master this bewitching style, blend and layer shades from light to dark. It’s like painting with shadows that dance around your eyes. This technique transforms your entire look with a flick of the wrist.
Table of Contents
Essential Tools for Smokey Eyes
Sculpting a smokey eye masterpiece starts with amassing the right tools of the trade. You’ll need a set of brushes: one for applying a wash of color, a fluffier one for blending, and a precise angled brush for defining edges. Crucial to your arsenal are quality eyeshadows—a spectrum from pearly light to intense dark. Don’t forget a primer to keep your artwork intact, and an eyeliner to add depth and drama. With these in your kit, you’re ready to bring the smokey eye canvas to life!
Selecting the Right Brushes
A solid lineup of brushes is the secret weapon behind every fierce smokey eye. Just like artists use different brush strokes, you’ll need varied types with specific jobs. The right brushes mean smoother application and a blended, sultry finish.
For building your base color, a flat, dense brush is your go-to ally, commonly known as a “shader brush”. It packs on color for a robust layer of the light or medium shades, serving as the foundation of your smokey creation.
A pointed crease brush is essential for blending shadows seamlessly in the eye crease.
To achieve the signature soft and hazy edges, a fluffy blending brush is indispensable. It effortlessly diffuses color, ensuring there are no harsh lines. And don’t forget a small, angled brush for adding definition and mystery near your lash line. It’s the final flourish that brings your smokey eye to life.
Ideal Eyeshadow Palettes
An ideal palette steers clear of shimmers and shiny hues when aiming for a classic smokey eye.
For the newbie or the palette enthusiast, a collection featuring both cool and warm neutrals in matte finishes is a smart choice. This range will cover all the bases from a soft, subtle gradient to a bold, intense look. Look for shades that include deep blacks, various grays, and warmer tones like browns and taupes. Quality matters here; pigmented, blendable shadows will make your smokey eye stand out and last longer.
Consider palettes that offer a mix of texture and hues to keep things interesting. A good smokey eye palette shouldn’t just stop at grays and blacks. Including a variety of dark, jewel-toned shades such as deep purples, blues, and greens can add a unique twist to your smokey eye, while still staying true to the dark, sultry vibe we’re after.
When selecting a palette, consider longevity and the types of occasions you’ll use it for. Palettes that provide both staple smokey eye colors and a few adventurous shades will give you more bang for your buck. That means both versatility and the freedom to experiment with different smokey eye looks, from traditional charcoal to a modern pop of color. After all, makeup is an art, and you’re the artist with the power to create endless smokey configurations.
Primer and Liner Picks
Before we dive into those alluring shadows, let’s focus on the canvas. A top-notch primer is your smokey eye’s best friend, keeping colors vivid and in place all day.
Now, let’s talk eyeliner, another smokey eye essential. Opt for creamy liners that glide on and blend like a dream. It’s all in the blend with smokey eye makeup!
Choosing the right eyeliner is crucial for defining your eyes. Black is classic, but a dark brown or grey can offer a softer appeal, still giving you that smoky depth without the harshness. Think of liner as the framework that accentuates the eyes; it’s your outline before you color inside the lines with shadow.
A smokey eye isn’t complete without a swipe of liner along the waterline—think of it as the final touch to your smokey masterpiece. While waterproof liners excel at this, gel liners provide a rich pigment that can amp up the drama. They form a base for the smokiness, allowing the shadow to seamlessly merge with your liner for an unstoppable, mesmerizing gaze. Remember, the goal is to “smoke” out the lines, not draw attention to them.
Smokey Eye Color Blending
When creating a smokey eye, think of your eyeshadows like a sunset, with each shade transitioning smoothly into the next. Start with a light base color on the whole lid, then streak in a darker tone through the crease, blending upwards and outwards for that signature gradient. With smokey eyes, there’s no harsh lines; it’s all about the magic of blending until the colors whisper into each other.
The key to nailing this sultry look lies in the blend—gentle strokes and a soft brush are your best pals here. Remember, the darker shades should hug the lash line and outer corners, creating that classic smokey contour, while lighter shades rest near the brow bone and inner eye to brighten and pop.
Gradient Technique Basics
Let’s talk gradients – they’re crucial.
Think of painting a sunset across your eyelids. You want to layer colors like you’re an artist, starting with pale shades and then introducing deeper ones. Go for a transition so smooth, that each color seems to melt into the next. Remember, a gradient is all about that seamless shift from light to dark.
Start with the lightest color as your base.
Now, bring in the middle tone. It’s your bridge color – it helps us transition from light to shadow with grace. Just like the gradient in a sunset, your eyeshadow should have a color that connects the light and dark with harmony.
Finish with the deepest shade, right at the edges. It’s like adding the night sky to your sunset, giving your eyes an edge that’s bold yet sophisticated. Just keep blending until the colors hug your eye like the perfect ombre.
Mastering the Transition Shade
The transition shade is your eyeshadow symphony’s maestro, dictating the flow from light to dark.
- Choose a transition shade that’s a mid-toned color, ideally one that complements your skin tone for a natural gradation.
- With a fluffy blending brush, sweep this shade into your crease, using windshield wiper motions to ensure a soft, diffused look.
- Build up the color gradually; it’s easier to add more than to take away. Aim for an intensity that bridges your lightest and darkest shades effortlessly.
- Continuously blend the edges to avoid harsh lines, making the transition shade almost imperceptible yet pivotal.This step is a game-changer, artistically blending your colors without any abrupt stops.Nail this, and you’ll have a smokey eye that’s as smooth as silk and as blended as your morning smoothie.
Smokey Eye Step-by-Step
Now, dive into those deeper, darker colors. Pick a shade or two darker than your transition color for that mysterious intensity. Pat this onto the outer corner of your lids and along the lower lash line for that classic smokey allure. Gently blend inwards to meld with your transition shade, erasing any harsh lines and creating a sultry gradient that makes your eyes pop.
To finalize this captivating look, grab a shimmer or highlight color. Dab it right at the inner corners of your eyes and beneath your brow bone; this adds dimension and a touch of starlight twinkle to your gaze. Remember to blend, so everything looks seamless. Finally, line your eyes with a smooth kohl pencil or a gel liner, and lavish your lashes with mascara for that ultimate smokey eye drama that’s both enigmatic and totally eye-catching.
Laying the Foundation
Start with a clean, primed eyelid.
Before any eyeshadow comes into play, it’s vital to begin with the basics. Use an eyeshadow primer or a concealer to create a blank canvas. This helps your makeup cling to your skin, evens out your eyelid color and texture, and prolongs the wear of your smokey eye, ensuring the hues stay true all-day.
Apply primer across your entire lid.
Smooth out that primer evenly. It’s the key to make sure your eyeshadows blend effortlessly. Without it, darker colors could get patchy or wear off, and we don’t want that. So, spread that primer from lash line to brow bone, and give it a minute to sit.
Pick the perfect base shadow.
Now, choose a neutral eyeshadow shade that matches your skin tone to set the primer. This will provide a smooth surface that will allow the other colors to glide on and blend more easily. Think of it like laying down a silky blanket for the vibrant shades that’ll come next in your smokey eye journey.
Defining the Crease
First, identify where your natural crease is.
Your crease is the area of your eyelid that literally “creases” or folds when your eye is open. By adding depth with a darker shade in this hollow, you emphasize the shape of your eye, creating the illusion of deeper set eyes that pop. Careful blending is key to avoid harsh lines that can make the eyes look harsh.
It’s important to select the right color.
Choose a matte shade slightly darker than your skin tone – it’s the shadow’s job to mimic a natural shadow. You want the shading to look seamless, like it’s part of your natural eye structure, but with a little dramatic edge.
Apply the color with a blending brush.
Gently sweep the shadow into the crease with a soft, fluffy blending brush. This brush is your secret weapon for creating a subtle gradation of color that looks professional and polished.
Build the intensity gradually.
It’s much easier to add more color than to take it away. Start with a light hand, and build up the intensity slowly, adding layers until you reach your desired effect. Remember, we’re creating a smokey eye – it’s all about that sultry, gradual transition of colors that makes eyes mesmerizing.
Smudging and Highlighting
When creating a smokey eye, smudging is your best friend for that dreamy, diffused look.
- Apply a kohl pencil or cream eyeliner along your upper lash line and start smudging it gently with a brush or smudger tool.
- Use a tapering brush for precision when smudging the edges to create a soft, blown-out effect.
- Blend a darker eyeshadow over the smudged liner to deepen the intensity and add dimension.
- Highlight the inner corners of your eyes with a light, shimmery shadow to make them stand out.
- Sweep a highlight just below your brow bone to lift and define the eye shape.Highlighting balances the smokiness, adding strategic sparkle and shape.Now, gaze at your masterpiece: a perfect harmony of shadow and light, with edges that whisper rather than shout.
Troubleshooting Common Issues
Sometimes, your smokey eye might look more like a bruised peach than a sultry fog. If the shadow looks muddy or the lines aren’t as smooth as you want, don’t fret. Grab a clean blending brush, and go over the edges with a soft, circular motion to blur away harsh lines. If the color’s too intense, dust a bit of translucent powder over the top to lighten it up.
Dealing with fallout – those pesky specks of eyeshadow that drop onto your cheek? Have no fear! Before applying your smokey eye, place a loose powder or a thin layer of setting powder beneath your eyes. Once you’re done, just sweep it away with a fluffy brush, taking the fallen shadow with it. Voilà, clean and sharp!
Preventing Eyeshadow Fallout
Head off trouble before it starts.
Eyeshadow fallout is like the party pooper of makeup. Imagine you’ve got your face looking all kinds of fabulous, and then these little flakes of eyeshadow sprinkle down onto your cheekbones, messing everything up. It’s a makeup mishap that can smudge your perfection and dull your sparkle. Luckily, a bit of preparation and technique can help you sidestep this nuisance altogether.
First things first, prime your eyes.
Why deal with fallout when you can prevent it? Just like a painter preps their canvas, your eyelids deserve the same VIP treatment. Slap on a good quality eye primer to give your eyeshadow something to cling to. This way, instead of doing a swan dive off your eyelids, those pigments will stay put.
Delicate dabbing is your friend.
Heavy-handed moves? No, thank you. When applying eyeshadow, a gentle pat-pat-pat is the golden rule. If you’re too rough, you’ll send a shower of color down your face. So, be nice and treat your eyes like delicate little flowers. They’ll thank you with a flawless finish.
Use shadow shields, or go DIY.
Now, here’s a nifty trick up the sleeve – literally. There’s this thing called a shadow shield, which is like a mini cape for under your eyes. But hey, if you don’t have those, grab some sticky notes or even a little piece of tape. Stick it under your eyes, and any stray shadow will stick to them instead of your face.
Brush off mistakes without a trace.
Nobody’s perfect, and everyone gets a little fallout now and then. When that happens, don’t rub—brush! Use a fluffy fan brush to whisk away the wanderers. This way, you’ll maintain that fierce smokey eye without any signs of a dust-up. Keep it clean and keep it fierce; 2023 is the year you conquer the smokey eye battleground.
Achieving Long-lasting Wear
To keep that smokey eye going strong all day or night, prep is key. It’s like building a house; a solid foundation is essential.
- Prime your eyelids with a good eyeshadow primer to prevent creasing.
- Use long-wear eyeshadows or pigments known for their staying power.
- Set the look by dabbing on a setting powder over the top of your eyeshadow.
- Seal the deal with a light mist of setting spray to lock in your artistry.
Remember, blending is your best friend for enduring beauty. Blend, blend, then blend some more!
Great makeup isn’t just about application—it’s about staying power. Let your smokey eye be the one thing you don’t have to worry about!
What creates the perfect base for smokey eyes?
To create the perfect base for smokey eyes, you’ll need a few essential products and techniques.
First, start by applying an eyeshadow primer to your eyelids. This will help the eyeshadow adhere better and prevent creasing throughout the day.
Next, apply a neutral eyeshadow shade all over your lids as a base. This will create a smooth canvas for the rest of your eyeshadow colors and help them blend seamlessly.
To enhance the smokey effect, choose a dark eyeshadow shade like black, grey, or deep brown. Use a small eyeshadow brush to apply this shade to your eyelid crease and outer corner. Blend it well to create a gradient effect, gradually fading the color towards the inner corner of your eye.
For added depth, you can also apply a slightly darker shade along the lower lash line. This will intensify the smokey effect and make your eyes appear more defined.
To finish the base, apply a highlighter shade to your brow bone and inner corner of the eye. This will add brightness and dimension to your smokey eye look.
Remember to always blend your eyeshadows well to achieve a seamless and professional-looking result. Practice and experimentation will help you find the perfect combination of shades and techniques that work for you.